Awareness | LAG (Link Aggregation Group) not establishing with Auto-LAG feature enabled
Gain insights on how to use Auto-LAG feature on Q-SYS NS Series Gen 2 network switches
Information
Unfortunately, Auto-LAG feature enabled on Q-SYS NS Series Gen 2 network switches will not automatically create LAG when multiple connections exist between two switches. In order to use the feature, consult with Netgear support.
If you want to manually configure LAG, follow the steps below.
How To | How to configure LAG between Q-SYS NS Series Gen 2 switches
Procedure
Note
The steps below are only applicable for Q-SYS purchased NS Series Gen 2 switches (Netgear M4250) with Q-SYS Configuration loaded.
- Disable MAC Filter configuration on the switch ports that you want to configure LAG.
- Login to the Main UI of the switch
- Navigate to Security > Traffic Control > MAC Filter
- Select the existing MAC Filter with the MAC address of "01:00:5e:00:17:af" and the VLAN ID of “1675”
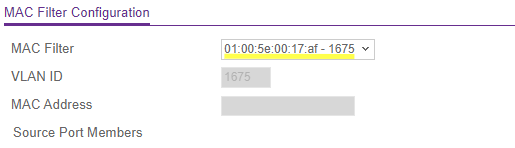
- Unmark the source and destination port members for the port you wish to configure LAG
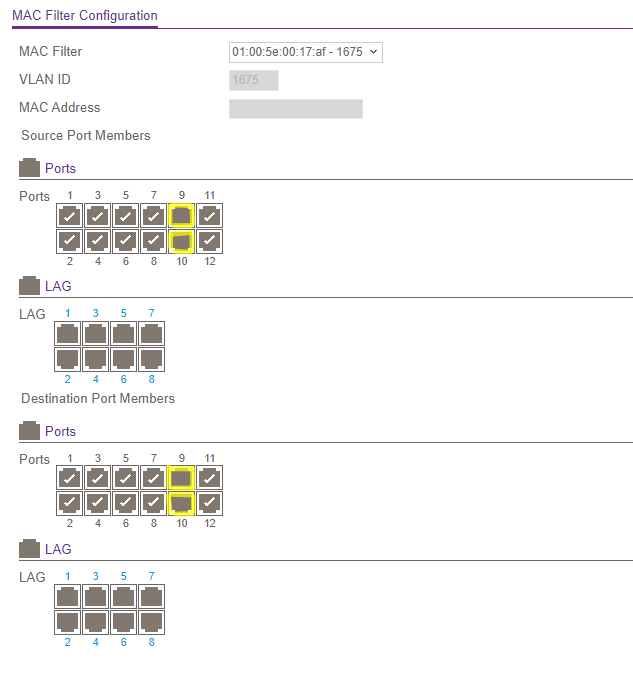
(In this screenshot, ports 9 and 10 were unmarked)
- Click Apply to apply the changes to your configuration
- Manually create LAG on the interfaces you desire.
- Login to the Main UI of the switch
- Navigate to Switching > LAG > LAG Membership
- Select the LAG ID from the drop-down list to the LAG number you desire to configure (Usually set to LAG 1 if this is the first time configuring LAG on the switch)
- Configure the LAG Name and the LAG Description as you desire
- Select the ports you wish to include in the LAG
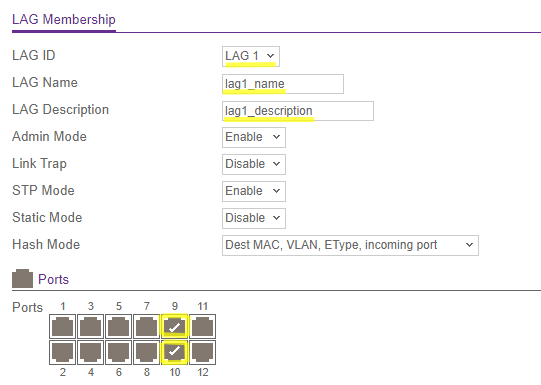
- Click Apply to apply the changes to your configuration
- Add MAC Filter configuration on the LAG interface you just created.
- Login to the Main UI of the switch
- Navigate to Security > Traffic Control > MAC Filter
- Select the existing MAC Filter with the MAC address of "01:00:5e:00:17:af" and the VLAN ID of “1675”
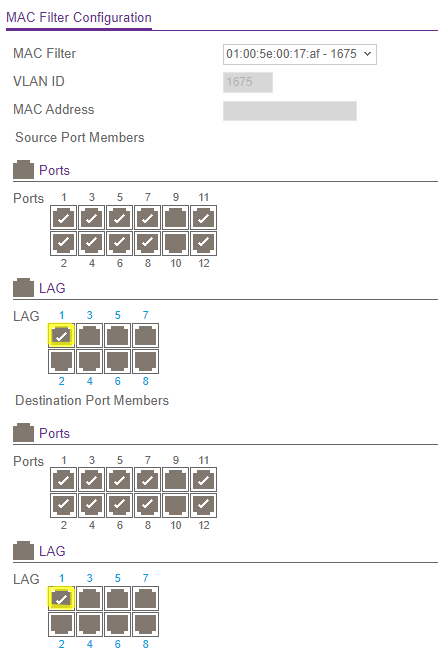
- Click Apply to apply the changes to your configuration
- Click Save to apply changes to the startup-config.
- Repeat the steps above on the other switch that you wish to configure LAG.