Factory Reset | Netgear M4250 (NS Series Gen 2) Network Switches
Learn how to perform a factory reset on NS Gen2 switches from Netgear.
Procedure
There are three methods that can be used to reset Netgear M4250 (NS Series Gen 2) Network Switches to its default settings:
Note
The procedures below restore the Q-SYS default settings to the NS Series Gen 2 switches. These instructions are not intended or supported for non-Q-SYS purchased switches.
From AV UI
- Launch a web browser.
-
In the address field of your web browser, enter the IP address of the switch. The login page displays.
Default IP for Netgear M4250 (NS Series Gen 2) Network Switches
M4250-10G2F-PoE+: 192.168.0.120
M4250-10G2XF-PoE++: 192.168.0.121
M4250-26G4F-PoE+: 192.168.0.110
M4250-26G4F-PoE++: 192.168.0.111
-
Enter the default username and password in the AV UI section.
Default Username and Password
Username: admin
Password: qscsystems
- Click the AV UI Login button.
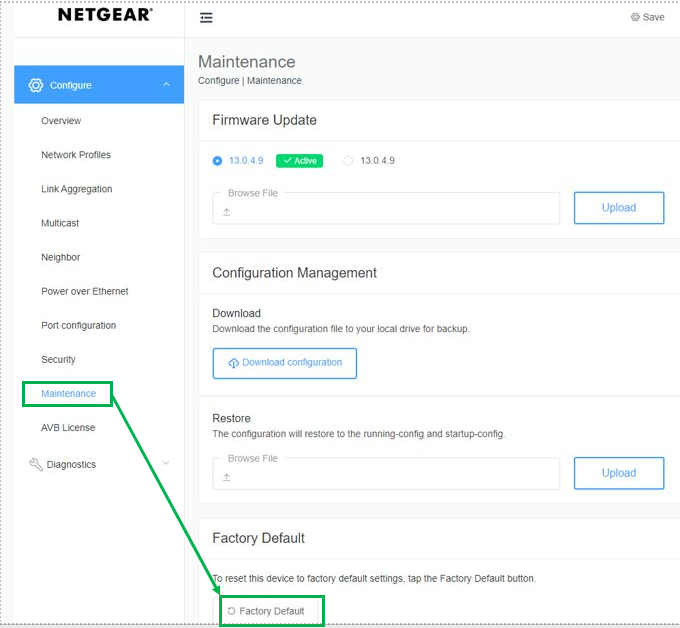
- Select Maintenance from the left hand menu. The Factory Default page displays.
-
Select Factory Default button.
- Launch a web browser.
- In the address field of your web browser, enter the IP address of the switch. The login page displays.
-
Click the Confirm button. (A confirmation pop-up window displays)
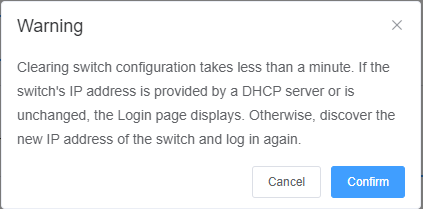
- The configuration is reset to the QSC factory default settings.
From Main UI
- Launch a web browser.
-
In the address field of your web browser, enter the IP address of the switch. The login page displays.
Default IP for Netgear M4250 (NS Series Gen 2) Network Switches
M4250-10G2F-PoE+: 192.168.0.120
M4250-10G2XF-PoE++: 192.168.0.121
M4250-26G4F-PoE+: 192.168.0.110
M4250-26G4F-PoE++: 192.168.0.111
- Click the Main UI Login button. The main UI login page displays in a new tab.
-
Enter the default username and password.
Default Username and Password
Username: admin
Password: qscsystems
- Select Maintenance > Reset > Factory Default. The Factory Default page displays.
- Select the check box.
- Click the Apply button. (A confirmation pop-up window displays.)

- Click the OK button to confirm. The configuration is reset to the QSC factory default settings.
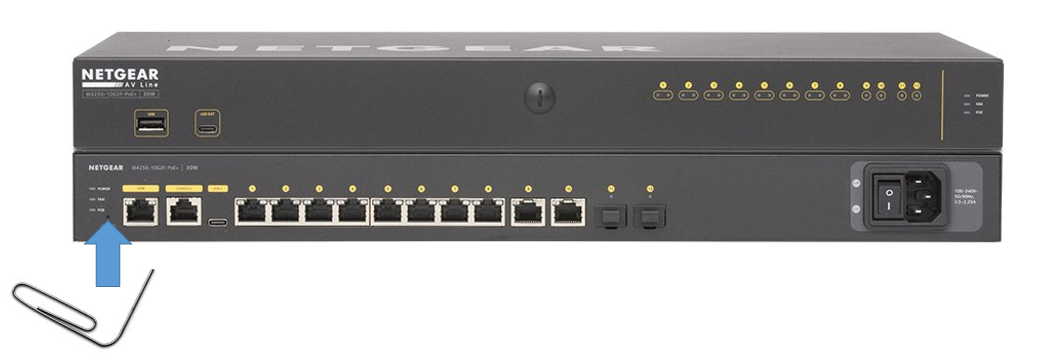
Paperclip Method