How To | Update Firmware on Netgear M4250 (NS Series Gen 2) Network Switches
Learn step-by-step instructions on how to update the firmware on a Netgear M4250 (NS Series Gen 2) Network Switch.
Procedure
Caution
Q-SYS cannot provide support for unapproved firmware versions or config files.
For information about the supported firmware/configuration versions, see Awareness | Netgear Switch (M4250) firmware & configuration version.
There are two methods that can be used to update firmware on Netgear M4250 (NS Series Gen 2) Network Switches:
From AV UI
- Launch a web browser.
-
In the address field of your web browser, enter the IP address of the switch. The login page displays.
Default IP for Netgear M4250 (NS Series Gen 2) Network Switches
M4250-10G2F-PoE+: 192.168.0.120
M4250-10G2XF-PoE++: 192.168.0.121
M4250-26G4F-PoE+: 192.168.0.110
M4250-26G4F-PoE++: 192.168.0.111
-
Enter the default username and password in the AV UI section.
Default Username and Password
Username: admin
Password: qscsystems
- Click the AV UI Login button.
- Select Maintenance.
-
Select active firmware to load too.
Firmware Tip*
Use M4250L images for 8 port switches, and M4250H images for 24 port switches
- Select the up arrow to upload the firmware file.
-
Select Upload to push firmware to network switch.

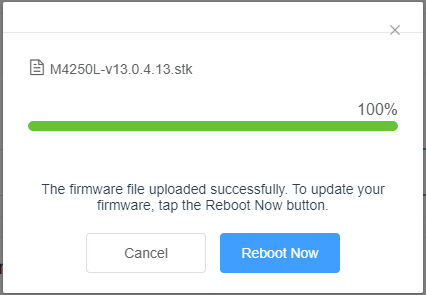
- Wait for the pop-up message to load the firmware.
- Select Reboot Now once the upload finishes.
From Main UI
- Launch a web browser.
-
In the address field of your web browser, enter the IP address of the switch. The login page displays.
Default IP for Netgear M4250 (NS Series Gen 2) Network Switches
M4250-10G2F-PoE+: 192.168.0.120
M4250-10G2XF-PoE++: 192.168.0.121
M4250-26G4F-PoE+: 192.168.0.110
M4250-26G4F-PoE++: 192.168.0.111
- Click the Main UI Login button. The main UI login page displays in a new tab.
-
Enter the default username and password.
Default Username and Password
Username: admin
Password: qscsystems
- Select Maintenance > Upgrade > HTTP file Upgrade.
- Select Software for File Type drop down menu.
- Select image1 for Image Name drop down menu.
-
Select Browse to choose the firmware file to upload.
Firmware Tip*
Use M4250L images for 8 port switches, and M4250H images for 24 port switches
-
Select Apply button on the far right.

- Wait for pop up message to finish loading file.
- Save and reboot the switch.