How To | Making an Adjustable Time-Based Trigger without Scripting
Learn how to create an adjustable time-based trigger without the need for scripting, allowing you to automate actions and events in your project with ease.
Procedure
Having a state that can be set to fire at a specific time can be useful when trying to control an audio player or a control in your system. This guide will show you how to put together the foundation for a trigger fired on a variable schedule using only components.
Note
This example is limited to a one second on/off cycle.
- Drag the necessary components into the design space and configure them as follows:
- One Date/Time component
- Select the ‘output’ control pin
- One Control Function component
- Set the Function property to ‘String Equal’
- One Custom Control component configured to have two control groups
- Group 1:
- Set Type to ‘Time Knob'
- Set Count to ‘1’
- Set Custom Range to ‘Yes’
- Set Minimum to ‘0’
- Set Maximum to ‘86399’
- Group 2:
- Set Type to ‘LED’
- Set Count to ‘1’
- Group 1:
- One Date/Time component
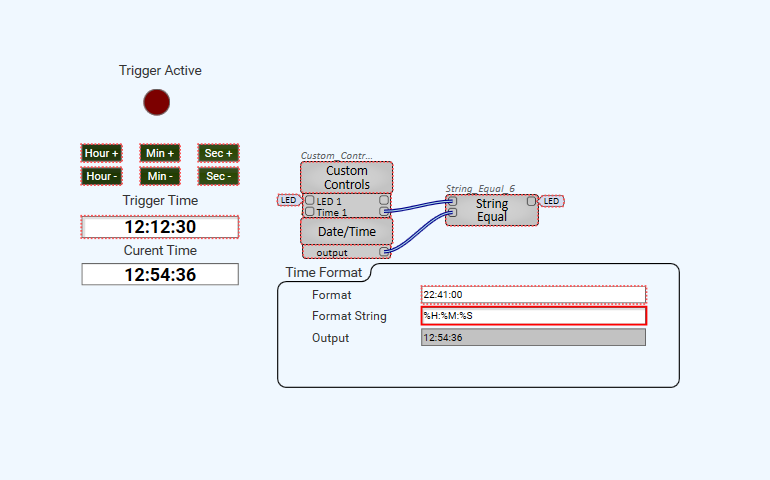
- Connect the control pins as follows:
- Connect the Custom Control's control pin output to the String Equal's ‘Input 1’ (top) control pin input
- Connect the Date/Time's ‘output’ control pin output to the String Equal's ‘Input 2’ (bottom) control pin input
- Connect the String Equal's ‘Output’ control pin output to the Custom Control's ‘LED 1’ control pin input
- Press the F6 key to enter Emulation Mode
- Open up the Date/Time component and set the Format String control to “%H:%M:%S”
That's it! Now set the desired time for the state change to happen. The LED will go true for 1 seconds and then go off.
Example
The screenshot below shows UI that may be useful. The H:M:S buttons are copies of the time knob. The properties have been changed to be a button with a string of -00:00:01 for -1 second and 00:00:01 for +1 seconds and so on. The text is just typed on
